Removable Steering Wheel
This guide shows you how to fit a removable steering wheel to an Esprit. This comprises of a to parts, one attaches to your steering wheel hub, the other to your wheel. Two reverse levers hold the wheel to the hub, simply pull both to release the wheel, just like F1 cars. Fitting adds around 25mm to the length of the wheel, which shouldn't be noticeable. Fitting is done on a 89 SE and does need a small amount of fetting.
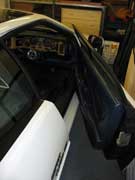
Fitting a removable steering wheel serves two main purposes. The first is giving easier access in the out of the Esprits cockpit. By removing the wheel, getting into the Esprit is all the more easy. This is especially useful to taller drivers who have problems getting their legs under the wheel. The second is security. A removable steering wheel is a very useful deterrent to thieves. Removing your steering wheel overnight if you don't park your Esprit in a garage is a great security device. Also if you're going to leave your Esprit somewhere for a long time or somewhere you don't know. Removing the wheel will reduce the likely hood of it being stolen. If you can't take the wheel with you, placing it in the boot will still deter most thieves. As a note the device comes with a key to stop your wheel being stolen. Another benefit of the removable wheel is that any work in the Esprits footwell will now be easier as the wheel can be removed for easy access. It's also a great little gadget for your Esprit ;-)
Snap-off hubs can be bought from car accessory stores like Halfords. See www.raid-rdi.com for kit, they should be under £100.
Installation
This is a fairly simple install and should take around 1-2 hours.
|
You will need the following parts: Snap-off
kit |
You will need the following tools: A
socket set with a 19mm socket |
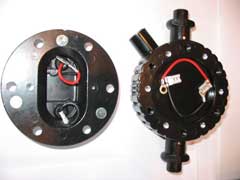
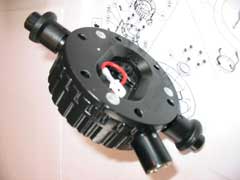
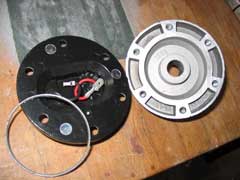
The kit comprises of a hub attachment to take the place of the steering wheel and an attachment for the steering wheel that mates up with it. The fitting, if done this way moves the wheel just 25mm closer to the driver. The kit: You can see here it has horn connections if needed. Wheel attachment: Pull handles out to remove, the third lug is a lock to prevent wheel thefts.Both parts together: Note the hub attachment has a smooth back plate.
First, and most important. Turn your wheel to center, do not move it again!. Now remove wheel center to gain access to the bolt holding the hub on, hold wheel firmly and remove the bolt (if you remove the wheel beforehand it will be harder to undo this). Mark on the hub where the top is before you remove - as the stub for the steering lock needs to match up with the fitment in the column.
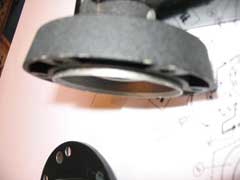
Now remove the wheel from the hub. My SE's hub has a small bezel petruding from it that will need to come off as the new hub fitment is flat backed. You can get a spacer ring to do this but that only adds to the overall thickness of the kit so i decided to remove this bezel. Removing the bezel means the wheel is no longer a centric fitment. However fitting a spacer would cause this too and ALL after market hubs are flat anyway. Even with the Bezel removed the wheel can be re-fitted as original if you sell the car and want to keep the kit.
I carefully removed as much of it as i could safely with a junior hacksaw (nice small teeth so a 'slip' will not cause big marks or scores) To do this i clamped it in a vice with wooden packing to prevent damaging the hub. Then i 'flatted' the whole surface of the boss by attaching a light grade emery paper to the worktop with double sided tape and rubbing down on it with the hub (in circular motions) until it was perfectly flat.
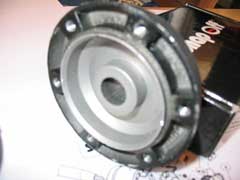
Unbolt the hub from the car: Note the centric bezel that prevents the hub plate fitment from being attached. You can a spacer get to bridge the gap... But as it will no longer be centric then, i decided to remove it. Taking off the bezel: After market boss's do not have them anyway - and it keeps the thickness of the fitment down to a minimum too.
Now re-attach the factory hub to the car (right way up) and tighten. It is easier to quickly re-fit the wheel to gain leverage to do up the nut. I bet you had already fitted the other bit to it like i did!
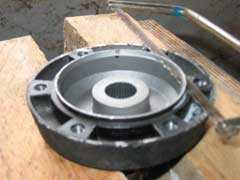
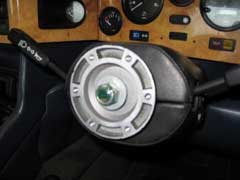
Boss flatted out: Took a while using light grade emery paper only. Boss re-fitted to car. Fitment attached to boss: Getting in and out the car in the garage is heaps easier now :
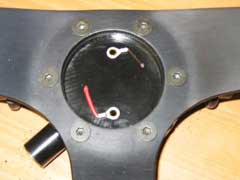
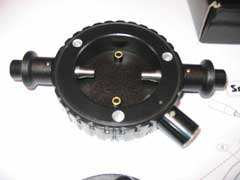
Now you can fit the hub plate. first thing i did was cut off the horn wires as the SE does not need them and i didn't want a new rattle. To work out the right way up for the hub, attach both parts together. The release lugs need to be horizontal to the hub, it's just down to choice if you want the lock facing up or down (decide which will be easier to get to, i chose down). Mark the top of the hub piece, separate the two and attach the hub plate with the screws provided.
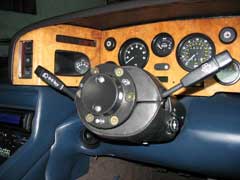
Wheel attachment fitted. Horn wires - not needed: I cut off the crimps to avoid creating a new rattle. Wheel attachment fitted: See it clears the wheel center pad nicely.
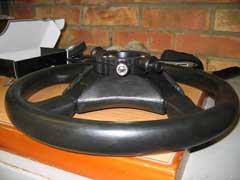
You can now attach the steering wheel adaptor to the hub and fix the wheel to it using the screws provided. Re-fit steering wheel center.
If you now put the key in the lock then pulling the two collars will remove your wheel!. To re-attach just pull the two collars out and 'snap-on' the wheel (you only need the key to take it off so it will never 'accidentally' come off while driving!!!!).A total thickness of 25mm: (a LOT less than an after market hub kit). Release levers: Pull out collars to release wheel (unlock first). You would hardly know it was there.... and no need for one of those 'go-cart' style aftermarket wheels too! Better access in and out of car.
Verdict
by Paul ChandlerThe Snap-off steering wheel boss is NOT a good product (am gutted).
You felt how tight the fitment was on my SE?.
Well, i got the car back from Steves the day before the oxford meet. Until then i had not been 'too' hard on her as 'C' service was well due, i had a leaking shock and seizing caliper (and a very busy summer of work). Oxford was my first chance to really rag it without a care, and thats what i've been doing since.
Facts:
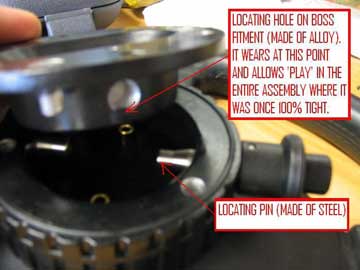
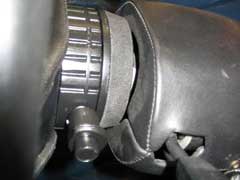
The steering column Boss attachment is made of alloy.
All the locating pins are made of steel.
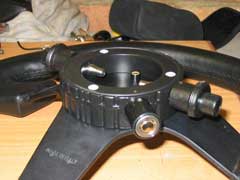
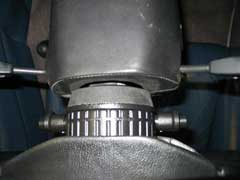
Under stress the hard steel causes wear to the softer alloy.
Play then develops.
In one month of use, the fitment shows some play. I can actually see the wear in the locating holes of the boss. (sorry the picture is not very good quality,but it shows what i mean)
Have taken the kit back today and got a full refund. My warnings about the inherent fault in design fell on deaf ears to the robotic halfords staff. I would suggest this kit will naturally wear on any car, but my non-power steering SE with its big wheels & tyres has probably put as much wear in two weeks that a hot hatch would put on in a year.
I would not reccomend this product :(
This mod was performed by Paul Chandler on his 1989 SE
If you have any comments, feel free to e-mail LEW at admin@lotusespritworld.com
|
|