
Bulkhead Mounting Plate Modification
by Rob Stansfield
Rattles and squeaks are a common part of the Esprit experience, which most owners happily accept. However, there is one common problem that causes a very noticeable, loud and frequent “clunk” noise to come from somewhere behind the seats. It is most noticeable on bumpy / uneven roads, and many people initially think that something in the engine bay has come lose!
Well, the good news is that this problem is easy to fix and doesn’t require a great deal of time. Better still, it’s free! (assuming you have the necessary tools of course).
|
You will need the following parts: None |
You will need the following tools: 13mm Spanner, |
Before starting, it’s good to understand the cause of the problem,
and how to solve it! The Esprit has a multi-piece bulkhead that sits between
the Engine and the passenger compartment. Interestingly, this is made of
ply wood! To fix the bulkhead in place, Lotus use mounting plates, mounted
from the passenger compartment side, and bolted through the bulkhead to a
bracket in the Engine bay. There is one mounting plate behind the driver’s
seat, and another behind the passenger’s seat.
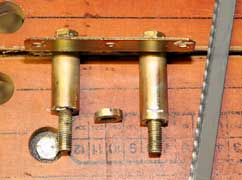
As can be seen from the diagram above, the mounting plate has a metal sleeve that surrounds the mounting bolt as it goes through the bulkhead. The cause of the problem is that, over time the ply wood bulkhead compresses slightly, and consequently the metal sleeve ends up being too long. The result is that the bulkhead is no longer firmly held in place by the mounting plates, and moves when the Esprit travels over rough ground. This causes the nasty “clunk” noise.
The solution to the problem is to reduce the length of the mounting plate sleeves, and thus allowing the plates and bolts to firmly clamp the bulkhead in place. In order to do this, the mounting plates need to be removed, the sleeves need to be shortened, and then the mounting plates refitted.
This guide is split into the following steps:
Step 1: Locate the mounting bolts in the
engine bay (passenger side)
Step 2: Locate the mounting plate in the passenger compartment (passenger
side)
Step 3: Cut a letterbox to gain access to the mounting plate
Step 4: Remove the mounting plate
Step 5: Shorten the sleeves
Step 6: Refit the mounting plate
Step 7: Repeat all steps for the driver’s side
Step 8: Test drive
Step 1: Locate the mounting bolts in the engine
bay (passenger side)
Before the mounting plates can be removed,
the first challenge is to find them! The problem here is that they are mounted
behind the seats, underneath
the carpet and soundproofing. If an attempt is made to fully remove the carpet,
as the carpet is glued in place, it usually tears and generally ends up a
mess. So, a better approach is to cut a letterbox into the carpet and soundproofing,
allowing the carpet to be folded out of the way to give access to the mounting
plate.
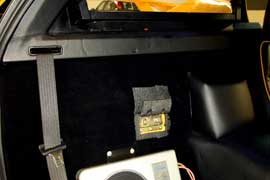
Still, the tricky part is locating the mounting plate under the carpet. The best way to do this is to start in the engine bay, and find where the mounting plate bolts emerge from the bulkhead. The photo below shows the location of one of the bolts. The other is a couple of centimetres to it’s left.
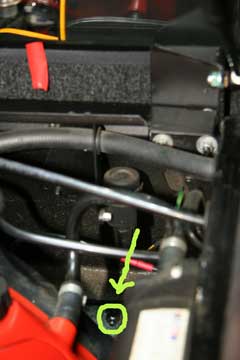
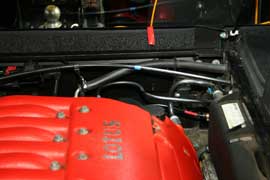
Once the bolts have been located, take a small piece of sticky tape and stick it to the window directly above the centre of the two bolts in the engine bay. This will make it easy to find the correct location of the mounting plate from inside the passenger compartment. The photos above and below show red tape stuck to the window. The photo below gives a better idea of where to find the bolts in the engine bay.
Measure the distance from the bottom of the window (under the tape) to the centre of the mounting bolt. This again will allow the correct location of the mounting plate to be found from inside the passenger compartment.
Step
2: Locate the mounting plate in the passenger compartment (passenger side)
If
the passenger seat has an adjustable angle back, this step can be performed
my moving the seat as far forward as possible,
and tilting the seat forward.
However, if the seat back is not adjustable (as on an ‘02 V8), it is
easier to remove the seat to gain better access to the mounting plate. The
seat can easily be removed by undoing the 4 seat bolts, accessed from underneath
the car.
With the seat out of the way, use the sticky tape marker on the rear window
(from the previous step) to find the rough location of the mounting plate.
Measure down from the window (again from the measurement taken in the previous
step) to find the exact location of the mounting plate.
Step 3: Cut a letterbox
to gain access to the mounting plate
Once the exact location of the plate
has been determined, cut a letterbox shape in the carpet and soundproofing
using
a sharp knife (Approx 14cm wide
by 7cm tall). It is best to cut along the left side, right side and bottom
of the plate. This allows the carpet to be folded out of the way while the
plate is removed. The carpet can then be folded back in place neatly after
the job is complete.
As the soundproofing is thick, it can be hard to feel the bolts and mounting plate underneath them. A thin sharp tool such as a very small screwdriver (or even a needle) can be pushed through the carpet / soundproofing to help locate the edges of the plate.
Step 4: Remove the mounting plate
Each mounting
plate has two bolts that go through the bulkhead. These bolts need to be
removed. On later Esprit models,
the bolt heads are welded to
the mounting plate, and so it is easy for a single person to just undo the
nuts on the engine bay side. On older models, two people may be required
for this process – one to secure the bolt heads from inside the car,
and the other to undo the nuts from the engine bay.
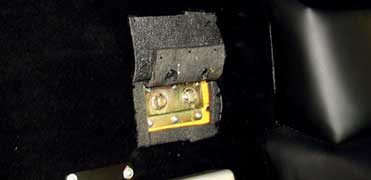
The mounting plate is fastened to the bulkhead with six screws. Once the bolts have been removed, the six screws can also be removed. The mounting plate will probably need to be prized from its location with a flat head screwdriver and then removed from the car.
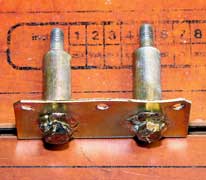
The photo above shows the mounting after removal from the car. Three of the six screw holes can be seen, along with the welded bolt heads and the mounting plate sleeves.
Step 5: Shorten the sleeves
The sleeves need
to be shortened by 3 to 4mm. This can be done with any suitable metalworking
tool, for example a
hacksaw.
Step 6: Refit the
mounting plate
Refitting of the mounting plate is simply a reverse of the
steps above. Remember that the fixing bolts should be tight, but not over tight!
The sound proofing
and carpet can be folded back into their original position, and probably
don’t even need gluing as the carpet will hold itself in place.
Step
7: Repeat all steps for the driver’s side
Once the passenger’s side is complete, the process should be repeated
for the driver’s side. Usually the driver’s seat is fully adjustable,
so there should be no need to remove it.
Step 8: Test drive
Finally the best bit! Take the Esprit out over the bumpiest roads around,
and enjoy
Verdict
What a difference this modification makes! The horrible clunking sound has gone, and the car feels totally solid, even on very rough roads. This even gives a greater feeling of confidence, as the car no longer sounds like it's going to fall apart when going over bumps. All it costs is about 1.5hours of effort, and no parts – that’s an investment well worth making!
This mod was performed & supplied by Rob Stansfield on his 2002 V8.
![]()
If you try this, feel free to e-mail us with your Verdict at admin@lotusespritworld.com
To locate bolt heads/plate under the carpet use strong Neodymium magnet and chalk to mark the location.
Kind Regards
Mr. D
|
|