Starter Motor Removal
and Maintenance
by Jonathan Edwards
Replacing the starter can be expensive and in some cases un-necessary, this guide will show you how to remove the starter from the car and also perform simple maintenance on the unit, which could save you the cost of buying and fitting a new one.
Operation
The operation of the starter is very simple. Upon switching the key to position 3 on the ignition the starter relay comes in which connects a red-white wire on the starter to the battery live (battery +). The red-white wire feeds the starter electromagnet coil inside the starter body, when this is energised the coil moves a plunger mechanism in towards the front of the starter, this engages the starter motor gear with the flywheel and also completes a set of electrical contacts which enables the motor to turn so it can crank the engine.When you release position 3 on the ignition switch, power is cut from the red-white wire, allowing the plunger to return to it's spring return rest position, this action cuts the contact to the motor and it stops spinning at the same time withdrawing the starter gear from the flywheel.
You will need the following parts:
You will need the following tools:
Selection of screw drivers,
13mm spanner (for electrical connections),
17mm Long throw Socket + stubby ratchet
(for starter-Engine mountings),
10mm Spanner (for motor mount bolts to body),
Allen Key [can't remember 6 or 8mm]
(for splitting the body to the gearing section),
Removal
Before you do anything you MUST disconnect the battery, you will be dealing with Live cables directly from the power source, shorting them out to the engine / chassis will result in damage to the metal work and the battery itself. Remove the ground-neutral (- black) first and the live (+ red) second.
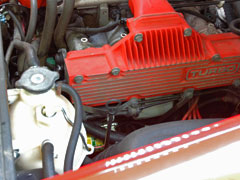
Although the starter looks difficult to work on it is in-fact a fairly easy job to do once you know the shortcuts, it should take no more than an evening to complete. Firstly you need to clear a space inside the engine bay to work on and retrieve the starter. Begin by taking the 2 pipes off of the air filter casing, the larger one is the air intake, the smaller is the crank case breather pipe. Tuck the pipes clear out of the area you are going to be working in.
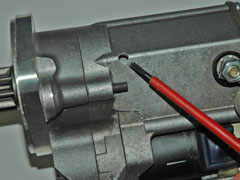
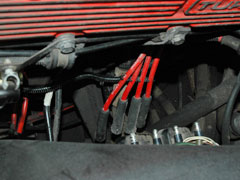
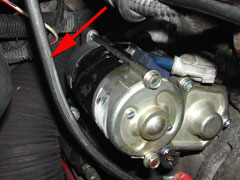
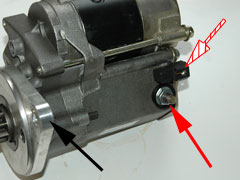
On the turbo cars there is a small air pipe coming out of the intake plenum, I would recommend removing this and the plastic fitting in order to get better access to the top retaining nut on the starter. I also moved the engine oil dip stick pipe back slightly (arrowed) and pulled the 4 sparking plug leads off from the distributor so that I had more space to manoeuvre the starter once I had got the unit free.
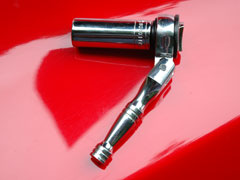
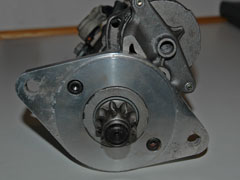
The starter itself is held on by 2 nuts, they are quite tricky to get to and I would recommend investing in a long throw 17mm socket and a variable angle stubby ratchet to get into these tight areas. You’ll find using a long throw socket (similar to a sparking plug socket) is easier due to the length of the bolts which hold the starter on, these are quite long and will impede shorter sockets.
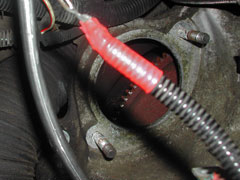

The nuts are very hard to photograph in place but by looking at the various pictures you can build a mental picture of where they are located. By removing these 2 nuts the starter can now be withdrawn towards the front of the car. Once out, rotate the starter in place so that the battery (red) cables can be removed from the terminal on the body using a 13mm socket / spanner. By pulling off the red-white cable from the connector the starter can then be completely taken out of the engine bay by lifting it up and past the air filter box.

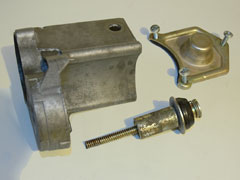
Disassembly:
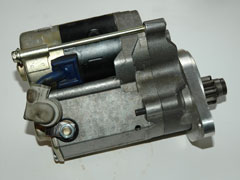
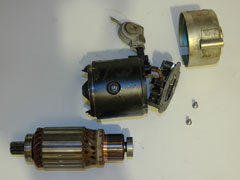
Now that the motor is out of the car I have decided to split it into 3 sections :
1) The Motor Itself
2) The Plunger / Contact mechanism
3) The Gearing1 - The Motor:
To remove the motor from the starter you need to undo the 13mm nut holding the motor Live connection to the starter body terminal. Next remove the 2 long bolts holding the motor onto the starter body, at this point ensure the whole unit is facing upwards (ie the gear wheel facing up) this prevents the motor falling apart when you take it off.
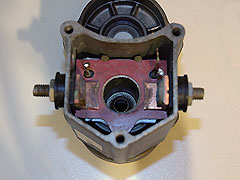
With the motor off, the 2 screws in the rear of the motor casing the back panel can also be removed to access to the motor’s commutator and brush set. The commutator (arrowed) is made from loads of copper strips and should be fairly clean, each segment should be free from damage and have a clear visible gap to the adjacent segment. Likewise the brushes should be free from damage and chips, they should also be of roughly equal length to ensure they are wearing down evenly.
Once inspected the motor can be re-fitted. Getting the commutator back into the brush set is a little tricky, the easiest way to do it is by pushing the brushes back a fair way so the spring flicks over and is no longer pushing on the back of the brush. This will prevent the brushes popping back and easily allow you to re-insert the commutator, once in place simply push the brushes back into position and the springs should go back as normal. The rest is the reversal of removal – remember the keep the motor facing up so the commutator does not fall out of the brush set or you will have to start again.
2 – The Plunger / Contact Mechanism:
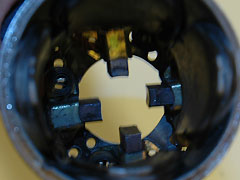
By removing the 3 cross head screws at the rear of the starter body you can remove the rear cap and access the plunger and motor contacts. The plunger can be withdrawn along with the return spring by simply pulling it back. The large disk on the plunger is actually the bridge between the two side contacts. The contacts along with the plunger bridge should be inspected for dirt, pitting and any bad contacts before being cleaned.You will notice that when the 13mm nuts on the side contacts are tightened the contact itself tries to rotate inside the body of the starter. This is a common reason why the starter will engage but the motor itself will not turn, this is because the contact is twisted up and prevents the bridge being made. Ensure the contacts are in line with each other and flat, if they are not they will serve as bad connection and the starter motor will have problems turning over.
3 – The Gearing:
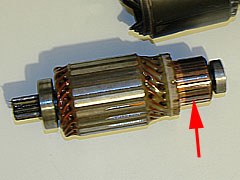
Undo the 2 allen key bolts next to the gear wheel that are holding the case to the front of the starter body. This time face the gear wheel down and pull the rear casing off, if you try it the other way, the gear wheel bearing will fall out sending the rollers all over the place, it’s easy to re-assemble but you don't want to lose one ! This bearing is pictured below and consists of the gear wheel, bearing cage and 5x rollers.
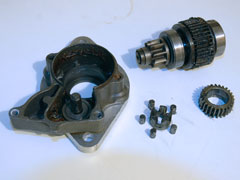
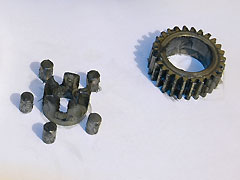
The gearing should be inspected for damage and grease applied if necessary to the moving parts before re-assembly – when in place ensure the gearing moves freely, there should be little to no resistance in it’s movement.
Bench Testing:
The motor should be bench tested before re-fitting to ensure it works. To do this you need a 12v Car battery, 2 jump leads and lead to simulate the red-white wire, ensure the motor is secure because when it starts it will try and jump somewhat, you can hold it down with your hand. Connect the Neutral-Ground (- black) to the metal body of the starter and the Live (+ red) to the bolt on contact next to where the red-white connector. By connecting the red-white connector to live the motor should function – you should see the gear wheel fly forward and begin to turn fairly quickly, by removing the red-white lead the motor will stop and the gear wheel should retract. These connections are shown below.
Final Note:
The problems with my starter was the fact one of the contacts inside the body had corroded severely on the bottom contact due to excessive water intrusion, I later found this hole in the casing of the starter, which I can only assume is a drain hole. The problem is it's facing up and not down - its a little curious so I covered it with some adhesive tape on 1 side of the hole so that it was partially sealed.
Verdict
This guide should be very useful for Esprit owners. We've heard of many owners having starter motor problems, including a friends S4s, which needed the 'old hammer' treatment a couple of times by the AA. This guide should give owners the information to repair their motor instead to having to go straight out and purchase a new motor, which isn't one of the cheap parts! Hopefully at least a few owners will save money due to this guide. Which is one of the primary reasons for LEW.
This mod was performed by Jonathan Edwards on his 1998 Esprit GT3.
If you have any comments, feel free to e-mail us at admin@lotusespritworld.com
![]()
Just a note to early Esprit owners (especially S1 and S2).
I replaced the starter motor, it was a simple and straight forward operation. It took about an hour to get the old one off, some stiff old bolts etc. The replacement was a high-torque unit from SJ Sportscars, it only took about 15 minutes to fit. All in all this was the simplest job I've done, yet it has made the biggest difference. My S2 now starts first turn of the key, everytime, in all weathers.Anyone who went on the 2003 run to Stoneleigh might remember the trouble I had starting it (I had stayed the night at the porridge pot), it was a bit embarassing and once I got it going I didn't hang around in the car park to chat or take part in the morning run to Stoneleigh, so missed out big time.
My only saving grace was that it had been very cold during the night and the car was covered in thick frost, which a few of the early arrivals to the Porridge Pot had noticed. So a few kind hearted guys did find me later (got parked inside the main hall - was well pleased) told me later they were surprised that I managed to get it started at all, so that made me feel better. Anyway, wouldn't have that problem now and this is one job I'd highly recommend.
|
|