One-Touch Windows
for the Revised Harness Lotus Esprit
This procedure should take around 2-4 hours to do for someone who is as electrically challenged as I am. An expert will finish faster. (All images are quite large and can be saved locally for viewing full size.)
When complete a single touch of the window switch will cause the window to open or close completely. A second touch will stop the window travel immediately.
Quick Synopsis
What you will need:
1. (2) WC1000 Window Control Units from Autoloc. These can be purchased online fairly easily. (Milito Auto Accessories has the best price as of this writing)
2. Wire cutters
3. Wire strippers
4. 12 and 16-18 ga. wire
5. Soldering iron and solder
6. Electrical tape
7. 13mm socket
8. Zip tiesSteps:
1. Disconnect the battery!
2. Remove driver's and passenger's seats for easy access - trust me.
3. Pull out the cigarette lighter/storage area for access.
4. Tap into the passenger side window and route the wires to the driver's side footwell.
5. Tap into the driver's side window wiring.
6. Tap into the positive and negative battery feed.
7. Tie up all wiring and the One-Touch units under the dash.
8. Replace the seats and reconnect the battery.Detailed Instructions
Disconnect the battery negative cable before you begin. This is important not only because you're working with the wiring, but also because you will be working close to the airbag circuitry. You definitely don't want to tamper with that! It can take up to 10 minutes for the airbag circuitry to discharge to the point it is safe.Then remove both driver's and passenger's seats. There are 4 bolts under the car for each one with 13mm hex nuts I believe. Just be very careful of your leather when you remove the seats. The driver's side is more difficult.
Pull out the center console storage unit. There is a single phillips head screw on the top underside of the storage unit. Once removed this center piece should slide out carefully.
Assume the Lotus position in the passenger footwell and notice the well wrapped bundle of wires near the center console under the dash. Unwrap a couple of inches so you have easy access to the wires and locate the Slate-White and Blue-White wires. These are the negative trigger wires for the window up and down respectively.
Cut each of them and attach new wires to each of the four ends. Then run the new wires (remember to label them with switch side or door side also) through the center console and out the drivers side. If you run these wires close to the top front they will be invisible without getting under the dash. You should be able to replace the center storage unit now and zip tie the passenger wiring securely.
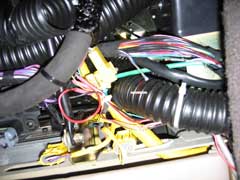
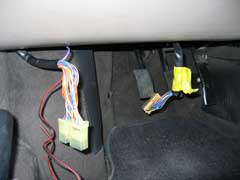
Disconnect the driver's door harness connector (DDHC) located close to the door under the dash. Also disconnect the steering column harness connector (SCHC) which looks just like the DDHC. Do NOT disconnect the airbag connector by mistake.
Splicing:
1. Splice into the brown-red wire on the SCHC. This is an unfused battery positive.
2. Splice into the black wire on the SCHC. This is an unfused battery negative (ground).
3. Cut the slate and blue wires on the DDHC leaving enough room on both sides of the cut to solder in another wire.
4. Solder the left window unit brown wire to the slate wire on the switch side (closest to the DDHC).
5. Solder the left window unit green wire to the slate wire on the window motor side (farthest from the DDHC).
6. Solder the left window unit white wire to the blue wire on the switch side (closest to the DDHC).
7. Solder the left window unit blue wire to the blue wire on the window motor side (farthest from the DDHC).
8. Repeat steps 4-7 for the right window unit, using the slate-white and blue-white wires instead of the solid slate and blue wires.
9. If you want your windows to automatically close when you lock the car with the key then splice (do not cut) into the light green wire on the DDHC and solder it to the grey wires on both window units.
10. Solder the red wires from both units to the battery positive wire.
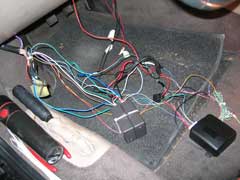
11. Solder the black wires from both units to the battery negative wire.Picture shown below with the installation of a keyless entry system. Ignore the black box on the right. You can see that I've zip-tied the two window units together.
Reconnect both harness connectors. At this point you should be able to reconnect the battery and test everything. If it all works then take zip ties and tidy up the wiring. If you look under the dash close to the door you will see a lot of space available for you to tuck the units and wiring up in there. Use zip ties to hold the units up there, but be careful not to impede the movement of the front bonnet release lever.
If you have any comments, feel free to e-mail us at admin@lotusespritworld.com
![]()
|
|