Inboard Rear Brake Change
MY76-87 Rear Inboard Brakes
by Peter Gentilli
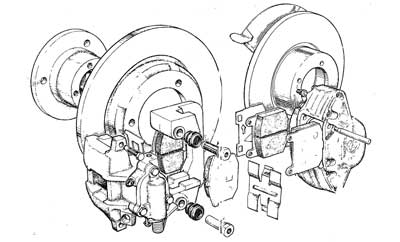
The Giugiaro Esprits up until the restyle by Peter Stevens in 1987 had inboard rear brakes. This was originally done to save weight, but more conventional outboard brakes were fitted during the restyle. Inboard brakes do have drawbacks to their weight saving, one of them is access for maintenance/replacement. This guide will help you tackle the tricky inboard rear brakes of the Guigario Esprit.
This guide has been done on a 1979 Esprit S2. The brakes are basically the same throughout the Giugiaro models, but the do differ slightly over the range.
Your rear brakes may only account for 30% odd of total stopping power but there’s no reason to leave them this long before changing.
Anything shown below is only a guide. You take the work on at your own risk and Lotus Esprit World take no liability for anything you do on your own Esprit. If in doubt leave it to a professional.
You will need the following parts:
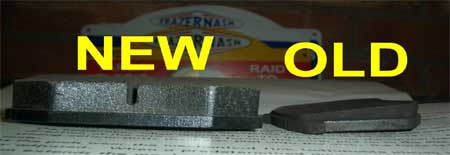
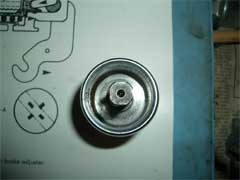
new pads
new disks
by Powerstop Brakes Ltd.You will need the following tools:
Spanners/sockets: 13mm, 17mm, ?”, 7/16”
C-clamp – min 6”
Key metal ?”
Key metal 1⁄4”
Big rubber/copper hammer
Copper grease
Caliper grease
2nd pair of hands
Estimated time: 3-4 hours if all goes smoothly (read put aside a day or so).
Removal and Refitting
Jack the car up and use axel stands for safety. As you are working on the rear, you should chock the front wheels to stop the car from moving while the rear is in the air.
Using the hand brake:
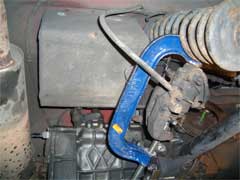
Disconnect the drive shafts from gearbox output shaft (I got someone to hold the wheel to do this as it’s quicker to turn the shaft and gain access to each bolt through the U/J). Slacken the 3 nuts holding the disc mount to the output shaft. Take the handbrake off (if used).The fun begins:
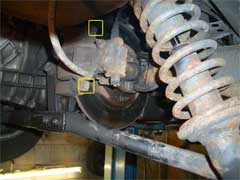
On the outside of the caliper you will see two 13mm bolts. These screw into the calliper mount bracket bolts.
Use a 17mm spanner to stop the larger bolts from turning as you unscrew the smaller ones. One on the 17mm bolts will have a normal bolt head, the other will have two straight sides to fit a spanner. The 13mm bolts were originally self-locking but you’ll probably find, as I did, that they’re just threadlocked (the manual says they should be replaced upon re-assembly).
IMPORTANT
Now the caliper is free, support it with some wire using the top of the spring so there is no pressure on the brake hose! Useful to drain it of as much fluid as possible and leave the bleed nipples open, you’ll see why later.At this point you can remove the old pads.
NOTE: If changing pads only, ignore this bit and scroll down to the next ‘NOTE’ - unless you’re feeling keen or you might like to learn something.
Now to remove the caliper mounting bracket. The disc will not come out without doing this so don’t try and wiggle it out.
The right hand mount is easy. Undo and remove the two long 17mm bolts attaching it to the ‘elephant ear’ gearbox mounting bracket. Access with a socket is easy. The bracket should now easily come away. Put it somewhere safe, you’ll be coming back to it soon. The left hand bracket is a little trickier due to the bolt access. The top bolt will need a spanner but there’s not enough space for a socket and ratchet on the bottom bolt. For the bottom bolt you’ll have to improvise as there is only a small gap between the bracket (which covers the bolt head) and the gearbox casing. It is possible to cut a socket down but it then depends on the size of the ratchet head as to whether it will fit and whether you’re happy to sacrifice a perfectly good socket. I took a shortish ? drive socket and took a 11⁄2 inch length of ? key metal (square stuff). Using the key metal sticking out of the end of the socket you then have something to turn with a spanner. It’s a bit fiddly but it works!• Off comes the caliper mounting bracket.Take the discs off. You might now need to soak the old disc and centre mount with WD40 or similar. One of mine knocked straight out, the other needed soaking and a lot of ‘persuasion’! I suggest a good clean with a wire brush and a smear of copper grease before mating the centre with the new disc.
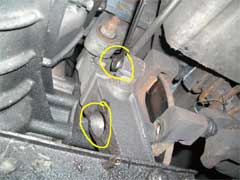
Now go back to your caliper mounting brackets while the discs are soaking. You will see two pins. 1 has a normal bolt head, the other 2 straight edges. These are very important and must be free to move in and out easily. One set of mine was seized so that caliper was useless as far as stopping was concerned.
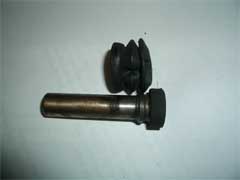
Take the pins out and check for damage, corrosion etc. One of the pins in each bracket will have a rubber sleeve on it; remember which hole it came out of!
Clean them up and re-lubricate with some calliper grease. Also check the rubber gaiters are not torn etc.NOTE: For replacing pads, tune back in now…Now, take a deep breath!
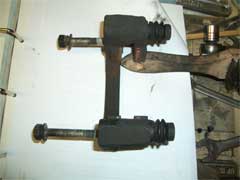
Go back to the callipers. In order to fit new pads the piston must be re-set. The problem here is the automatic handbrake adjustment system which will not allow the piston simply to be pushed back. Take a look at the picture below of the shaft coming out of the piston. What you can see easily is that the channel is smooth. What’s not so easy to see is that the splines are ribbed (for frustration rather than pleasure). The ribbed splines are what allow the piston to be locked in place as the pad wears so you don’t have to keep tightening the handbrake cables.
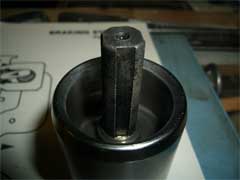
Imagine a cross-shaped hole at the end of a shaft with four teeth at each point of the cross that clamp into each notch of the thread on the piston shaft using a ratchet system. There is a gap between each of these four teeth. When the mechanism is set to work, the piston can move forwards but not backwards. The piston must be rotated to align the gaps with the splines thus allowing it to freely move back and forth.You will need another bit of that nice square metal stuff, or a suitable tool to fit between the 2 notches on the end of the piston allowing you to turn it. If you rotate it slowly (clockwise or anticlockwise) you will hear, hopefully (after you’ve turned down the radio), a small click which lets you know that all is aligned and the piston can be pushed back using a C-clamp. On mine the rotation was about 30º to clicking point.
DON’T FORCE IT!
If the piston won’t move, check the bleed nipple is open to release the pressure of remaining fluid behind the piston; even a little fluid will create quite a bit of pressure. Also try adjusting the piston rotation fractionally to make sure everything has lined up. The piston should move back easily with gentle pressure from the C-clamp so brute force is not necessary.Once in, rotate the piston so the two notches are perpendicular to the caliper (where they were to start with). There is a raised notch on the back of the brake pad that slides into the notch in the piston.
If all has gone smoothly so far, I’m jealous!
Putting it all back together is simply the reverse.
Here are a few tips:
• Make sure the rubber gaiter on the piston is in good nick.
• It probably goes without saying but clean up fixings and mating surfaces before putting it all back together. I use copper grease in most places just to make it easier for the next time.
• The caliper mounting bracket and disc will have to go on at the same time.
• The only torque settings mentioned in the book are for the two caliper mount bracket bolts. 30-35 lb/ft.
• Bolt the caliper back on and don’t for get to use threadlock on the 13mm bolts unless you have replacement self-locking ones.
• Re-attach drive shafts and tighten their bolts as well as the disc nuts.
• Use brake cleaning fluid to remove all grease etc from the discs.
• Bleed the braking system. Front right, front left, rear right, rear left.
• Take deep, satisfied breath and drink beer. Don’t forget to put the wheels back on.
Verdict
This guide will help you do regular maintenance on your Esprit. It will save you money and hopefully give you some pleasure (after the knuckles have healed) from doing the job yourself. Not difficult if you've got access to all the tools and a bit of patience. A 4 post lift helps as well!.
That said, you will have to decide if you wish to undertake this work or whether you feel it would be best left to a professional. Remember your brakes are a very important part of your car and work should not be undertaken if you are not capable.
This mod was performed by Peter Gentilli on his 1979 Esprit S2.
If you have any comments, feel free to e-mail us at admin@lotusespritworld.com
![]()
|
|