Lower Link Stud Removal
Don't break your hub carriers
by Jonathan Edwards, 1997 GT3After breaking 2 cast aluminium hub carriers on both the Esprits I run, I decided to collate my experiences and write a guide to doing this job properly. The whole thing isn't incredibly hard to do by any means it's just made worse by heavily seized bolts and and wrong procedure, however it really helps to stop, think, understand and plan ahead before actually taking tools to hand - I can't stress that enough.
Note
Before starting work it's worth noting if you have the have the hub carrier off the car then you will most likely need to release the drive shaft from the hub itself. This is held in place with a large nut which is done up to a very high torque. If you think the hub might need to come off it is best to slacken this nut off before dismantling the braking system as you will need the handbrake to lock the rear drive shaft as you remove the nut. The re-torque setting is 260NM so ensure you have access to a torque wrench of this size before taking the nut off or you're able to limp the car to a garage that can do the job.
What is the Lower Link stud ?
This part ties all the lower end of the rear suspension together into the cast aluminium hub carrier. It holds the lower link control arm and the shock absorber in place, it's important structurally but also it has the common capability to seize fast into the cast aluminium hub carrier and cause it to break when trying to remove it - the repair cost can come to £400 in parts alone !
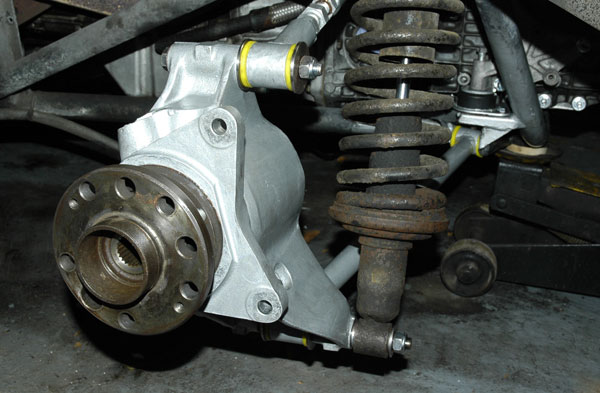
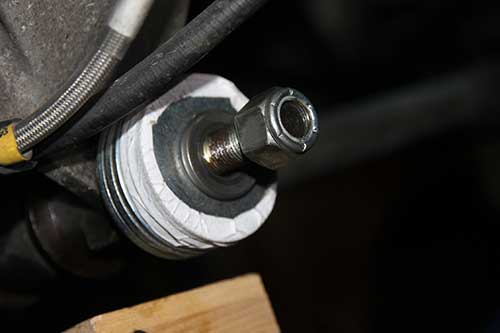
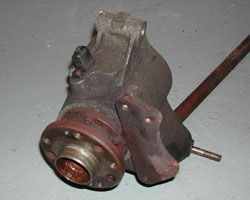
The above picture is the passenger side (UK) rear suspension, the hub is in the fore ground and behind which is the large silver hub carrier (these are separate components and not to be confused with one another) - on the right side is the shock absorber clear shown, and the control arm running back to the chassis.
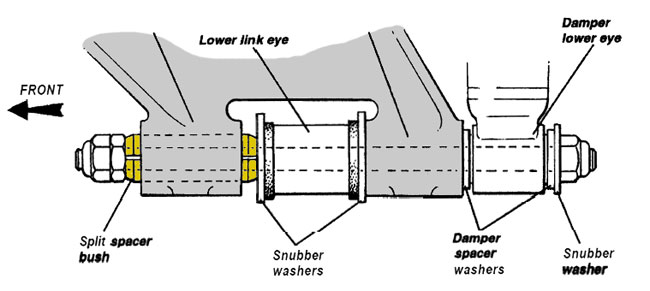
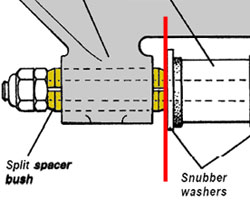
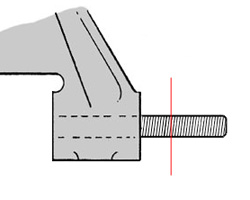
The diagram above is of the lower link stud assembly, note the split spacer and the washers as these are critical in order for the piece to function correctly. The grey area is the cast aluminium hub carrier.
- Removing the Stud
The biggest problem here is if the stud or the split spacer have fused to the hub carrier making them virtually impossible to remove !
HAMMER BLOWS CAN FRACTURE THE CASTING
Castings are very strong but also brittle, shock from hammer blows can crack castings so be extra careful.
I would not recommend using a hammer at any time whilst trying to remove the stud.
Stage 1
To start with douse the lot in WD40 and remove the nylock nut on the shock absorber end. Try and wind the front nuts IN as if you were tightening them. If you're really lucky the stud will try and move towards the front of the car as it is being pulled through by the nut, if this is the case simply keep winding it, when you reach the end of the thread remove the nuts and pack the stud out with washers and repeat until the damper can be released and hopefully the stud as well.
If the split spacer is stuck it should be crushed along the split to reduce it's diameter, it should fall out with ease.
A possible alternative is that the nut might be rotating with the stud in which case you need to try and take the front nut off. When you get it off clean the thread up on the stud with a wire brush and then winding the nut back on again but use packing washers between it and the split spacer to allow the nut to turn on the clean thread.
BEWARE :
Too much force on the nut will strip the threads if unsure use a torque wrench and don't exceed 120nm.Patience is a virtue here, the turning action should eventually loosen the stud and it should pull out. If the stud is rotating this is also good sign as it is not seized and should pull through in time. Releasing the lower link from it's chassis mount might also allow the stud to move easier, persevere with this and use plenty of releasing oil.
nstead of removing the hub carrier to get the stud out in 1 go it can be much easier following stage 2 as the stud should be replaced anyways.
Stage 2
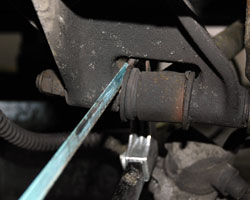
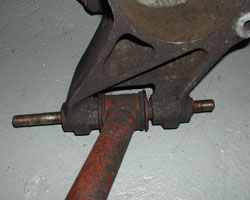
If the stud will not budge the last resort is cutting it in half. This will split the resistance and hopefully pull it out easier. Take a hacksaw and invert the frame and cut down between the front most snubber washer and the split spacer, shown below by the red line - here you will cause least damage to the expensive bits with the saw.
Once you cut the stud try the nut turning method from both ends again, this might release one or both halves of the stud.
If the stud is not turning you can probably expect the worst, they can seize in with incredible force, the probability of getting it off whilst the hub carrier is on the car is now almost none.
Whether you try using a blow torch to free the stud is upto you - remember the fuel system on the Esprit is not renowned for it's fume free properties with regards to the balance pipe and tanks which commonly leak on older cars. In my experience dragging the thing off the car and working on a bench is a much easier and safer option. Using heat will also trash the rubber bushing on the lower link control arm, however this is not expensive to replace.
At this point you might as well try and rotate the nut with as much force as you can as you have nothing to lose !
Stage 3
If all else fails you have to remove the hub carrier assembly. If the drive shaft nut is not slack, you should piece the braking system back together and using the brakes to hold the hub in place, undo the drive shaft nut. This is extremely tight hence the reason why you need the brakes to hold the drive shaft from rotating. If you can't release the drive shaft you'll have to remove the roll pins from the gearbox end and slide the lot off in 1 go.
Remove the following from the hub carrier in the recommended order :
Lower Link from the chassis - 1 bolt holds it on.
Upper link from the hub carrier - again just 1 bolt.
Radius arm to hub carrier - 2 bolts.
Damper from the lower stud - should just slide off.
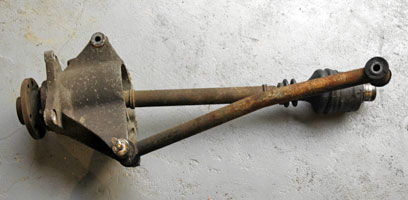
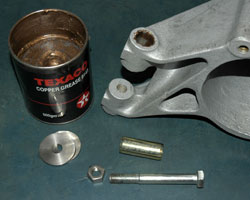
You'll end up with something like what's below, with or without the drive shaft.
With the hub carrier now on a bench you can use a variety of tools and possibly a blow torch to warm the casting in order to release the stud. DO NOT hammer it !!!
Grinding a flat on the exposed stud and holding it in a vice is a pretty good method.
If nothing can move the studs the last resort is to drill them out. This is easier than it sounds and you can do it on a bench vice if you're careful. Using the exposed length of the stud, or the brake caliper adapter, you can hold the hub carrier in a vice pretty easily.
Start with the rear most part of the stud as this is the hardest to remove, you need to leave about 20mm of stud showing out of the back where the damper was (more on this later) the rest can be cut off, shown in red below. Use a snubber washer as a barrier between the saw and the aluminium hub carrier in-case you slip, better to replace a 50p washer than a £350 hub carrier !!
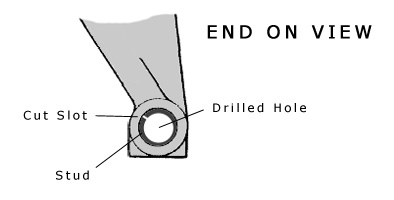
Carefully centre punch the stud (remember castings and hammer blows do not go together !) and using a 5-6mm bit carefully drill into the stud trying to keep it as centred as possible. Once you have your 'pilot' hole all the way through you can gradually increase the size of drill being careful to select one that is not going to start going into the aluminium ! When you reach the largest drill you're comfortable with, you need to cut carefully using a small / junior hacksaw blade down the inside of the hole you drilled to turn the stud into a split spacer. Once you are through the stud can be gripped in a vice on the exposed length and carefully squashed so that the sides actually collapse and move into the slit you made with the saw - this will reduce it's diameter and allow it to come out !
The exact same principal can be transferred to the front half except the cut is already made for you in the split spacer so it's just a case of drilling out the stud.
Easy yeah ?
Technical stuff on the lower link & split spacer.
Putting it back together is a lot easier but again is mainly down to correct procedure. I would recommend cleaning and replacing as much of the rusty bolts and nuts as possible mainly because as you took the bolts off against the rust it will have caused damage to the threads - it also means when you come to work on the car again it is a lot easier to work with.
In my\opinion the split spacer and the lower stud MUST be replaced, they are too important to scrimp on.
The parts from Lotus have the following code and approx price :
Split Spacer B082D4079F £10.60 inc VAT Lower Link Stud B079D4024F £13.60 inc VAT
The split spacer is a very important piece and must be free to move when re-fitting the suspension. When re-assembling the hub carrier the 2 end nuts need to be tightened to 70nm, if the split spacer wasn't there you would load the 2 lugs of the hub carrier so much they would probably break snap, the spacer acts by sliding inside the front lug to gap the bolt correctly under load.By using the old one seized in place you run the risk of putting the hub carrier lugs under un-necessary load and you can break them which is not only expensive but highly dangerous if the car is moving at the time !
The price is nothing compared to a cracked £350 hub carrier or a written off Esprit !
Re-fitting the lower stud & split spacer.
Before fitting, use a small piece of emery paper to clean out the holes in the aluminium hub carrier, aluminium does not rust but it does corrode and you might see white dust on the inside of these holes which is aluminium oxide. The holes should be then wiped with generous amounts of copper grease before fitting the split spacer.
The split spacer should be pulled in using the stud, or better still a suitable bolt - it should have little resistance when moving into the hole. The spacer is also tapered both ends to allow it to lead into the hole correctly, it should be coated with copper grease to allow it to slide and also combat the chance of it seizing in the hole again. When using a nut to wind the bolt / stud in, ensure there is a washer between it and the aluminium part or you will damage the softer metal.
Wind the split spacer in as shown below :

All mating faces and bolt shanks should be lubricated in copper grease, the Process for putting things back onto the car is as follows :
- Slide the hub carrier onto the drive shaft end and, ensure the spline coupling fits correctly and fit the end nut to stop it falling out.
- Loosely secure the upper link to the hub carrier.
- Swing the radius arm into position and fit to the hub carrier.
- Fit the lower link stud from the front of the hub carrier and secure the lower link arm (leave approx 1/2" of thread sticking out on the damper side). Ensure all the washers are correctly in place when sliding the stud in - ensure everything is well coated in copper grease.
- Lift the whole assembly so the radius arm is roughly horizontal and wiggle the lower link arm into place on the chassis.
- Let the suspension come back down and push the damper's lower fixing onto the exposed lower link stud.
From here the bolts can be nipped up but not torqued until the car is resting back on all 4 wheels - this is to ensure the bushes are in their 'relaxed' position and not stressed / twisted.
The hardest part to fit in my opinion is the lower link arm to the chassis, it doesn't appear to want to go in square but by lubricating the bushing and wiggling the hub carrier it will go in. This is where it is important not to torque the bolts up until the car is at rest, when lifted off its own weight the suspension is in an un-natural position and tightening it up now will cause ill effects in the car's exceptional handling.
- Tightening the Lower link Stud.
Particular attention should be paid to this component in order to not stress the expensive hub carrier as explained above.
Before tightening this component take a look at the diagram below :
Ensure all the nuts and washers are in place correctly. In order for this to work the split spacer MUST be able to move, this is why I suggest replacing them with new ones if the original are corroded in place - if it is stuck the action of tightening the end nuts on the stud will put excessive force on the hub carrier legs and could cause them to break !
From there the correct procedure is to tighten the damper nylock nut until there are about 2-3 threads showing. Now fit the front plain nut only for the time being - when tightening this plain nut ensure the damper side nut stays still on the thread. As you tighten the thread notice how the split spacer moves in towards the centre, ideally the snubber washers should be selected so they are thick enough to stop the split spacer half way into the hole in the hub carrier leg as shown above but this is not over critical.
These 2 nuts should be torqued to the correct setting of 70NM ideally when the car's weight is on the suspension so that the lower link bush is not held in a stressed position. Tightening this way ensures there is no tension on the two hub carrier legs and the split spacer has done it's job.
Finally fit the nylock keep nut to the front of the stud by again holding the nylock nut at the rear, next to the damper, and using a torque wrench on the front - be careful not to allow the socket to slip onto the plain nut that has been torqued or you might get a false reading.
Remove all excess copper grease, job done.
Verdict
Using the methods above no-one should have to replace a hub carrier again due to a seized lower link stud, it takes time and patience but it can be done.
This isn't a design fault with the components, the only way to have sorted this otherwise was to have factored in some sort of phosphor bronze bushing inbetween the stud and the aluminium casting but that would push the cost of the item up. To be fair the reason why these components seize so much is that they are hardly ever touched, you dont even really have to move the lower stu to take the damper off...it's just that when you come to it, time and corrosion has usually bonded the parts together.
How tough ? On the broken hub carrier I risked breaking the back of a 13 ton fly press, so I made a special punch to screw into the stud and see just how much it could take. Hitting it with a 7KG seldge hammer did not move it one bit !!
Heating the leg with a blow torch also wouldn't ease the stud, this was the bonding process over 18 years, I doubt that stud had ever been moved in that time until I tried. The only way to free it was to drill the thing out.
Can it be re-engineered ? Possibly, the split spacer could be machined from another material but the other leg would have to be drilled out slightly which would weaken the part plus jigging the hub carrier up to enlarge the hole for a bush would be pretty tricky.
Your best bet is to apply lots of copper grease and use new galvanised steel components such as the split spacer and the stud itself to combat the corrosion process. Once replaced, for most people it'll never be removed again for the duration of their ownership of the car.
This maintenance was performed by Jonathan Edwards on his 1997 GT3
If you have any comments, feel free to e-mail us at admin@lotusespritworld.com
USER COMMMENTS (March 15)
Having spent the last 3 days (!) removing one of my lower link studs to replace a bent lower link I thought I'd offer an additional tip regarding relocating the chassis end of the lower link into its receiver.I'd fitted new polybushes which probably made the whole thing a bit fatter and therefore more difficult!
Getting this end to relocate into the chassis mount is indeed the most difficult part of the rebuild operation as the link appears to be twisted out of square compared to the receiver you're trying to get it into. To overcome this I found that if you jack up the hub to swing it into it's more normal 'loaded' position, this squares up the end of the arm and it's much easier to get into place.
Regards
Neil Howarth
USER COMMMENTS (March 21)
I thought I add my advice to the procedure of the stubborn lower link stud removal.Before you start cutting the stud (stage 3) you may try the following procedure:
First of all, WD40 is good for water-proofing leather gloves or shoes only. Totally ineffective for this application. Instead, I have mixed (in equal amounts) Marvel Mystery Oil, ATF oil, Power Steering Fluid, Oil of Evergreen and 1 ml of Shaklee Basic-H surfactant.
Next, I mixed my "magic potion" with Acetone, 50/50, and applied it with the eyedropper to the ends and middle of the stud, as well as the split spacer bushing. I repeated it every day for 2 days. On the 3-rd day, I have placed 6 thick washers, which had I.D. larger than the split spacer and installed tall 1/2 UNF nut. Next a brut force was applied to the nut using an impact gun. This time, I was able to pull out the stud... together with the split spacer bush.
Over 25 years the stud fused itself permanently to the split spacer. New stud, split spacer and copious amount of Ni-Graphite antiseize paste were required.
Good luck.
MrDangerUS@hotmail.com
![]()
|
|