
Headlamp Lift Motor
Removing and refitting
Our Esprit starting having headlamp lift issues while it was being serviced. After our respray our drain holes in our pods got blocked, which filled them with water after a rainy week. Bit unlucky really as our Esprit spends 95% of it's time garaged. Anyway, our motor didn't like the water and started working intermittently. Winking occasionally soon turned into a permanent wink. The motor was removed and rebuilt, but to no avail. Lotus have a Repair Kit for the drive mechanism available. Inside the motor housing there is a drive gear that has 3 plastic inserts that eventually break up usually after 10 - 12 years. The motor runs but nothing happens. The kit has 3 new inserts and new gaskets. Our motor had other 'issues', so we sourced a second-hand motor from PNM Engineering, which we needed to fit.
Below we'll show you where the motor is, how it's fixed to the car and how to remove it and replace it. As the motor was rebuilt at a specialist, we don't currently have details on using the Repair Kit mention above (please feel free to supply a guide if you try it). The job isn't too difficult, but getting hold of a second-hand motor may be more difficult, which we'll go into at the end of this guide.
Removing & Replacement
This job will take about 1.5 hours and isn't particularly difficult.
|
You will need the following parts: New/Used lift motor |
You will need the following tools: 8mm & 10mm spanners or sockets
|
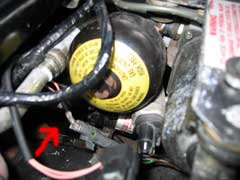
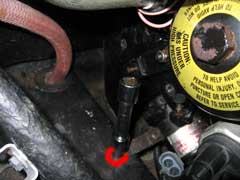
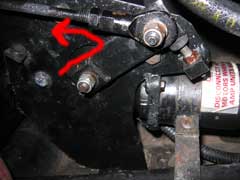
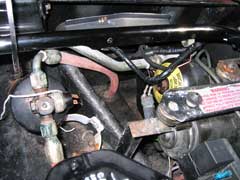
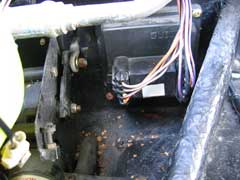
Unfortunately for us, our offside motor failed, which is situated under the ABS and Air-con bits, making it 10 times more difficult to get at than the near-side motor. You can't really see it from the top. The red arrow give you an idea of where it is. To help access, we undone the clamp holding the Air-con bottle after removing the plastic covering. This makes it a little easier and saves a little more skin on your knuckles. One nut and bolt hold the clamp to the bottle. Carefully move the bottle to the side once removed from the clamp.
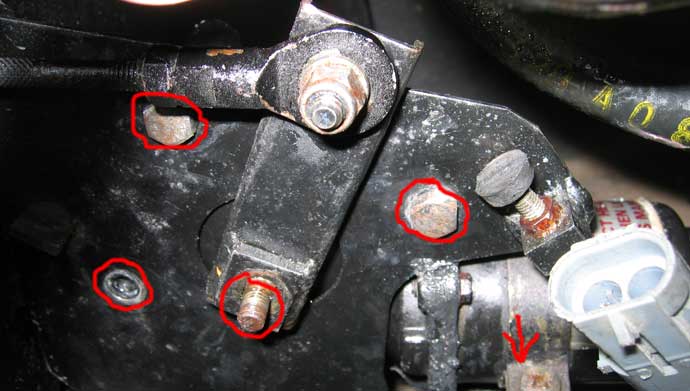
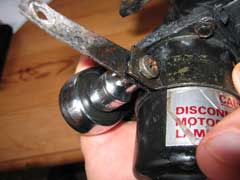
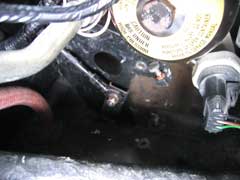
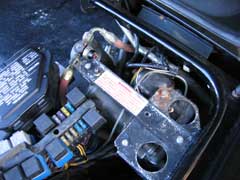
The motor is held in place by 3 bolts onto the holding plate and one bolt on a support arm. There is also a screw and nut (arrow above) holding the arm onto the motor and a further bolt (not seen in the pic above) holding the arm onto the bodywork.
You'll need an 8mm for the single bolt holding the arm on to the bodywork. The others are all 10mm. It's easier to remove the bolt on the bodywork, than the screw holding the arm to the motor, it's also easy to remove the motor with the arm attached.
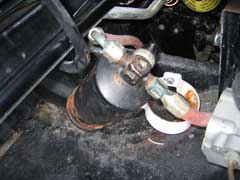
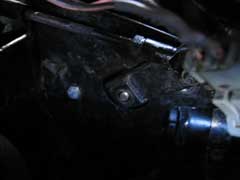
You do not need to remove the bolt holding the rod to the arm, as the arm is removed from the motor itself. Once all 5 bolts are off, you can slip out the motor from behind the mounting plate.
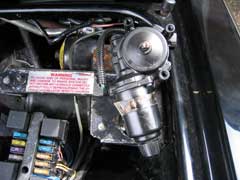
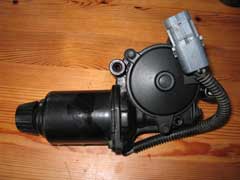
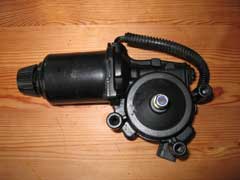
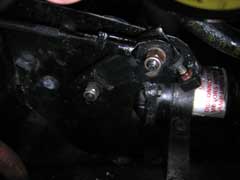
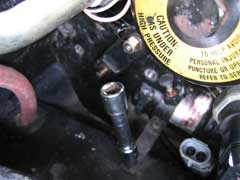
Now the motor is out, you can either refurbish it or change it. We exchanged ours for a refurb'd unit from PNM Engineering. You can see the manual screw (left end on pics above) on the end of the motor. This is to raise the light on motor failure. Turning this turns the motor manually.
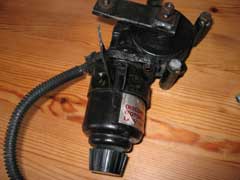
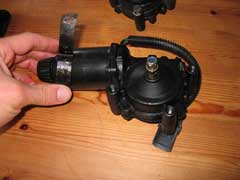
As we had a different motor going in we needed to swap the support arm over to the new unit. The arm is attached to the motor with a screw into a nut, so you'll need an 8mm socket or spanner with a philips screwdriver to get the arm off.
Now for getting the motor back in place. This is just the reverse of the removal, but, it's pretty tight on the right side (looks much easier on the other). We fixed the support arm back first, then the rod arm, then the 3 supporting bolts. You will need to turn the manual screw to line up the motor to the arm attached to the rod. We found this difficult as getting your hands in, lining up and attaching the bolts was tricky with only 2 hands. We managed it after about 30 mins and some lost skin on our knuckles.
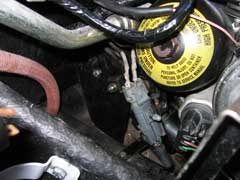
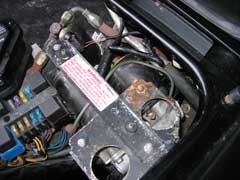
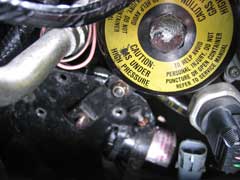
All in and the connection reattached. You'll see an ECU type box on the other side of the Esprit, near the water bottle for the windscreen washers. This is the control unit for the motors. This can get wet and we have been advised to drill a small hole below it to drain any water than may damage the unit. If you are having problems with your motors or lights (doesn't control the actual bulbs), then it's worth checking to see if this has any water damage and that the connections are clean. This unit can be refurb'd if damaged.
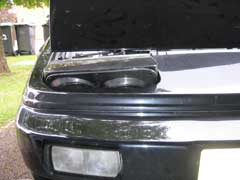
Once we had the motor back in, we tested the headlamps and got the results above. After much head scratching and repositioning of the control arm, pulling the connectors, we could cure it. We finally found that the supplied motor was probably not from an Esprit (maybe from an Elan) and the wiring was round the wrong way, even though the connectors only allow you to connect one way. So we cut the wires and re-connected them the other way round. This sorted the problem and our headlamp pods are working perfectly again. Note. On further investigation of our old motor, someone had previously repaired the brushes and had soldered the wires on the wrong way round!!! This explains why the recon unit worked back to front, the repairer must have reversed the wiring loom on the car to remedy his error
LEW's Verdict
This is a problem that will be familiar to some and will become familiar to others as our Esprit get older. The motors work will, but with issues like pods filling with water and just general aging, motors will need replacing or refurbing. It is worth checking a few things before going down the removal route. We have also seen the motor brushes stick causing the motor not to run. Once they are disturbed the motor runs ok. We see this on cars that are not used regularly. Also the control unit mention earlier in the guide.
We found out while looking for a new/used motor for our Esprit that the motors are currently unavailable from Lotus and on contacting Lotus, that they don't seem to be looking into restocking due to the original supplier going out of business and the cost of finding a replacement and all that goes with it. Most independents don't seem to have many in stock either, so a worldwide shortage could be on the cards. If the kit mention in the opening paragraphs doesn't help your motor and it's not the control unit, you'll be looking high and low for a motor and with the Elan using the same version, it could get tougher as time rolls on.
We've been talking to Lotus about the problem and they have found some After Market lift motors on the following we sites under these references....
Gm /Delphi part numbers 16523673 & 16523674 from a 1997-1999 Corvette available on GM parts Direct and Rock Auto
Normally Lotus would buy and sell them but they have not tested them. We've had no official word on whether they are direct replacement or need modification to fit the Esprit. This isn't good news and could see Esprit driving around with their pods up all the time due to lack of lift motors. Nobody wants to see that. So look after your motors and keep your pod drain holes clear.

This mod was performed by LEW on their 1992 Esprit SE
If you have any comments, feel free to e-mail me with at admin@lotusespritworld.com
![]()
One small addition to the OS headlamp lift motor removal:
If you undo the 2 10mm bolts in the lift pod holding the lift motor bracket the bracket can be gently bent out of the way allowing much easier removal and installation.Just a quick note on your headlamp motor refit guide: one of my motors was wired incorrectly too, but there was no sign of a repair to the wiring anywhere, it looks like some motors might be wired backwards!
In addition it is defiantly worth greasing the rose joints from the motor arm to the pod, mine were stiff and caused a lazy pod on one side.
Also it is worth adjusting the motor end float before installing.
Get hold of the manual raise knob and see if you can move it in/out from the motor body - there should be zero movement.
If there is any slop then there is a large stamped nut and large slotted grub screw on the opposite end of the motor shaft to the manual raise knob.
Back off the nut slightly (It's an imperial size) and screw the grub screw in until it just goes tight then try the knob it should be free to turn but have no in/out movement.
Retighten the lock nut while holding the grub screw still with a screwdriver.
Makes the operation of the lights smoother and also helps hold them up more securely.rich
|
|