AP Caliper Brake Pad Change
Changing the pads on your Esprit
by Dom
Benfall
A Little Brake History
I have the AP front brake up-rate kit from SJ Sportscars and the pads that came with it are EBC Greenstuff compound. While these are ok for normal road driving and although they’re a ‘night and day’ improvement on the original naff brakes, I’ve found that under heavy and prolonged braking, say from 70 to nought on a dual carriageway ;-) , they suffered from fade. So much so that I was scared on more than a few occasions.Initially I changed them to Ferodo DS3000 pads which are a racing compound (and not for road use) and they performed superbly. They basically stopped the car from speeds and in distances that were very impressive but after a track day and some heavy braking I found they made a constant high pitched squeal which became impossible to live with.
I decided that as I was about to do another track day I should choose a more user friendly pad, one that would give almost all the performance and wouldn’t make that infernal noise. After e-mailing AP direct one of there team said that their OEM kits and lots of aftermarket kits are supplied with DS2500 pads from Ferodo. These were the pads I would fit next.
Social/Legal Disclaimer
If you’re not mechanically minded this might help answer a few questions. If you are, you may just chuckle under your breath and find something a little more challenging on the world wide web.Either way, it just shows what I did and I don’t want to preach the definitive gospel on brakes because I aint qualified ! Read on at your own risk.
You will need the following parts:
New brake pads
Copper GreaseYou will need the following tools:
6mm Allen/Hex Key
Wheel wrench and jacks
Long necked screw driver (optional)
Nylon faced hammer (optional)
Wheel chocks
Removal & Refitting
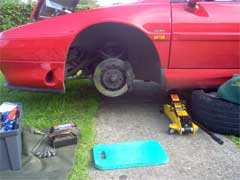
Firstly, I parked the car on a level surface, switched off the ignition, chocked the rear wheels and released the handbrake. (It will judder as you jack the car up otherwise). Then I pumped the brake pedal around 40 times to deplete the brake pressure. You will notice the pedal go light when this is done. I did this because trying to fit new pads with more ‘meat’ on them than the old ones, into holes held under tight hydraulic pressure is impossible.
Next, I ‘cracked’ the wheel nuts to release the initial tension. I jacked the car up and removed the wheels on both sides to relieve any twist stresses on the chassis and body. Pop the wheels under the car as a safety measure.
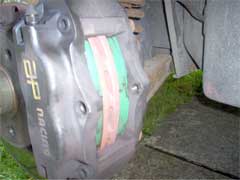
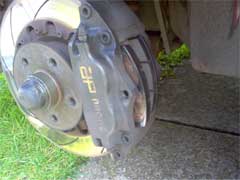
Using a 6mm alan key I undid the caliper retaining bolt and removed the anti rattle clip. Correct re-fitting can be found on the website here www.apracing.com/roadcar/brakekit/p14006.pdf. If you have lost the little reminder slip like me! I found a strong vertical grip on the bolt tube and a tiny blob of copper grease on the bolt end allowed easier removal and refitting. Try not to get any lubricant on any friction surface though.
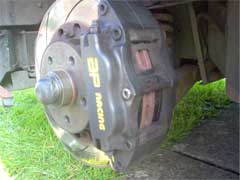
This is what you should see now. Everything is accessible.
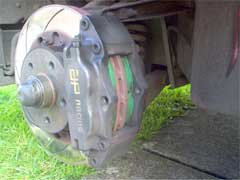
Using a long necked screwdriver was the easiest way, I found, off encouraging the old pads out. A gentle tap on the upper and lower edges and they popped straight out.If your old pads are worn low you will see more of the pistons emerging from inside the caliper and more time will be required to push them in and insert the new fatter pads. With the brake pressure depleted it shouldn’t be too much hassle ;-)
Bear in mind that if you remove both pads and press on pistons the fluid may push the opposite piston out a little more. In this case perhaps changing one at a time would be the way to go.
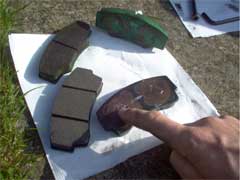
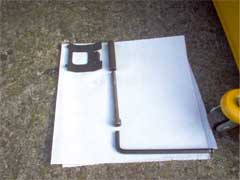
Here you can see the old and new pads. Hold the phone!!!!!! They’re different! Well, yes and no. The old Greenstuff are CP 2340 D44 part number (or AP pad size). The new DS2500 are CP 3345 D44 and are basically the same shape pad except for the bottom left and right edges which have been ‘filled in’. This allows for a larger pad to disc contact area and increased brake performance.
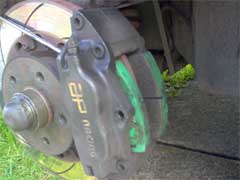
I added a small dollop of copper grease on the spots where the caliper pistons meet the pads and they’re ready for fitting. Again, don’t get any on the friction side or you will be in trouble!
The new pads went in with a few gentle taps from a small nylon faced hammer. Try not to impact the friction material, only the hard metal base when you do this.
Once the pads, retaining bolt, anti-rattle clip were all fitted and correct I popped the wheels back on and gently torque the bolts hand tight. With both wheels back on and the bolts hand torqued I lowered the car and removed the jacks. Then I torque the bolts to the correct twisty-ness. The manual states 10 daNm (74 lb.ft) and this applies to S4; USA and non USA S4s; GT3; V8; V8GT; Sport 300 and Sport 350.
Once my wheels were back on and torqued correctly the next job was to bed the pads in.‘ Bedding in’ is basically mating the surfaces of the pad to the disc to align all the microscopic ridges and ruts and put a thin layer of pad material on the disc. Only then will full performance from the brakes be achieved and boy will you see the differenceAP’s recommendations for bedding in are here: www.apracing.com/car/brakepad/bedding.htm
Verdict
As for simplicity, these calipers were designed for speedy servicing and replacement of parts (pads) in the pits and with a bit of practice the most mechanically challenged driver can tackle it. I would take some Swarfega and/or a pair of surgical gloves as it is a very messy job, what with brake dust and copper grease etc. Also the results can be seen as soon as the pads are bedded in correctly.
Please note, I performed this on my own car and I’m happy with the results.If you have any doubts about tackling a job like this don’t hesitate to seek professional advice. Let’s face it, you don’t want them to fail when you need them most!!!
Notes
Work like this can give the driver an indication of other potential areas for future service too. The pipe-work for the engine coolant, oil coolers and chargecooler are visible and can be scanned for leaks. Also brake pipes can be checked for leakages. Bushes and bearings can be checked for wear, wheels and tyres for scuffs, dents, nails and irregular wear.A myriad of jobs can be pre-empted when the wheels are off and the car is jacked up. It was when changing wheels that I noticed coolant leaking from a split pipe that only leaked under pressure, hence no tell-tale wet spot in the garage. Have fun!
This mod was performed by Dom Benfall on his 1994 Esprit S4.
If you have any comments, feel free to e-mail us at admin@lotusespritworld.com
![]()
|
|